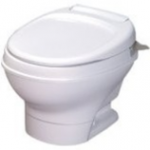
- Remove the stool.
- Remove two bolts, one on each side.
- Remove the water line located at the rear of the stool. (MAKE SURE WATER IS OFF)
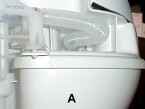
- Locate flush line between vacuum breaker and bowl.
- Flush line is located to left rear of stool. [Photo View A]
- Remove Water Module Link and discard. [It is the corrugated line.]
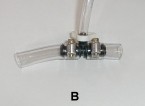
- Use the two pieces of ½ inch id clear vinyl tubing provided in kit, one 1½ inch long and one 2½ inch long.
- With the clamps provided, secure the two pieces with the arrow pointing towards the longest. [Photo View B]
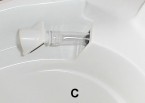
- Insert assembly through the hole [Photo View C] and attach the nozzle assembly. (No clamp needed)
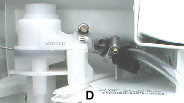
- Slide the other end over nipple at the Water Module and clamp. [Photo View D]
- Snap nozzle assembly in place.
- Reinstall stool, making sure all gaskets, bolts and water connections are secure.
- Mounting the dispenser reservoir to the wall.
- Locate reservoir to the back or side wall providing easy access for filling.
- Keep reservoir lower than back of stool.
- Screw reservoir into place with the three screws provided with kit.
- FINAL CHECK LIST
- Check water line for leaks.
- Check stool by flushing.
- Add a few ounces of Blue Streak Chemical® to reservoir.
- Flush stool. Finish filling reservoir.
Q: How Do I Winterize the Blue Streak Dispenser?
A: Run the chemical level low [1to 2 inches] in the reservoir and winterize your unit as you would normally. To remove chemical from the reservoir; unscrew the tank from the wall leaving tubing attached to tank and pour chemical into another container.