
- Remove the stool.
- Remove two bolts, one on each side.
- Remove the water line located at the rear of stool. (MAKE SURE WATER IS OFF).
- Unhook wires to stool.
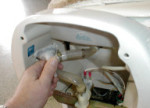
- Locate flush line between vacuum breaker and bowl.
- Cut the flush line half way between vacuum breaker and bowl. [Photo View 1]
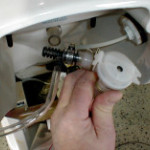
- Insert T-valve with small arrow pointing toward the bowl. [Photo View 2] THIS IS VERY IMPORTANT (T-valve will not work if installed backwards)
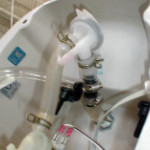
- C. With the two hose clamps enclosed in kit secure T-valve in place. [Photo View 3]
- Reinstall stool making sure all gaskets, bolts and water connections are secure. Reattach the wires.
- Mounting the dispenser reservoir to the wall.
- Locate reservoir to the back or side of the wall providing easy access for filling.
- Keep level or lower than back of stool.
- Screw reservoir into place with the three screws provided.
- FINAL CHECK LIST
- Check water line for leaks.
- Check stool by flushing.
- Add a few ounces of Blue Streak Chemical to reservoir.
- Flush stool. Finish filling reservoir.
|
|
|
|
Q: How do I winterize the Blue Streak Dispenser?
A: Run the chemical level low [1to 2 inches] in the reservoir and winterize your unit as you would normally. To remove chemical from the reservoir; unscrew the tank from the wall leaving tubing attached to tank and pour chemical into another container.